If we want to know how to control the thread, we should first understand what the common standards are?
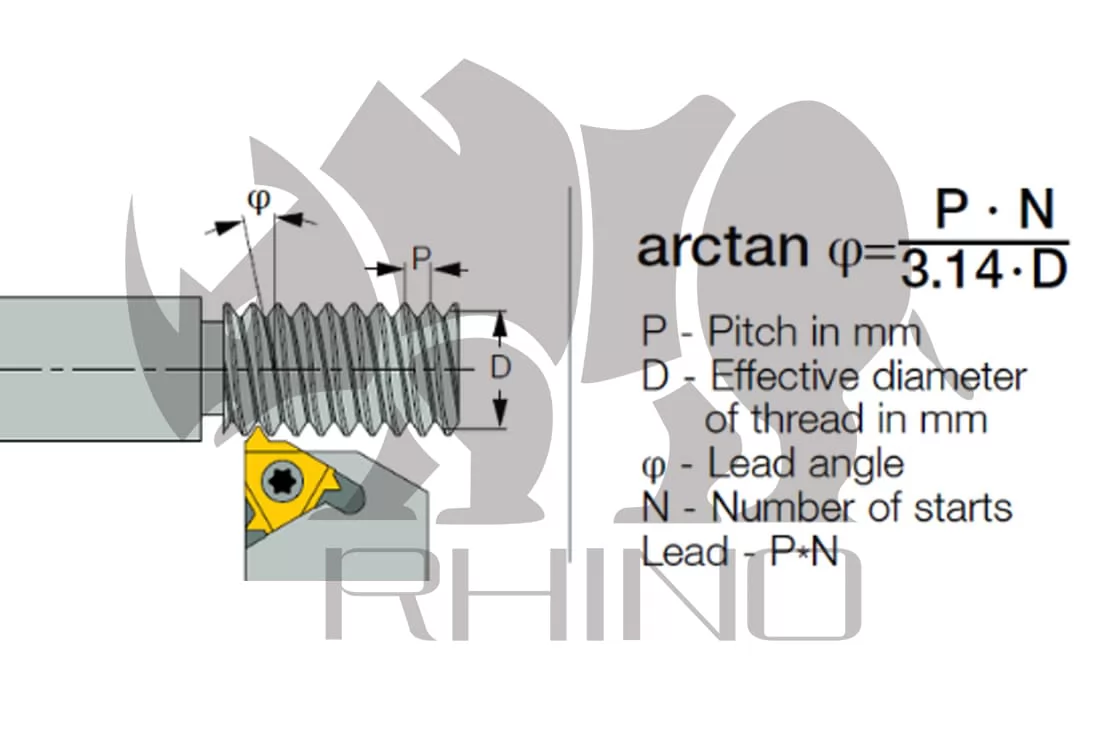
According to GB/T 192-2003 "Basic Tooth Profile of Common Thread", the following standards are stipulated:
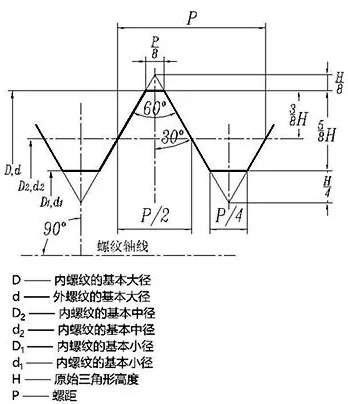
| Thread Pitch | 0.2 | 0.25 | 0.3 | 0.35 | 0.4 | 0.45 | 0.5 |
|---|---|---|---|---|---|---|---|
| H | 0.173205 | 0.216506 | 0.259808 | 0.303109 | 0.346410 | 0.389711 | 0.433013 |
| 5/8 H | 0.108253 | 0.135316 | 0.162380 | 0.189443 | 0.216506 | 0.243569 | 0.270633 |
| 3/8 H | 0.064952 | 0.081190 | 0.097428 | 0.113666 | 0.129904 | 0.146142 | 0.162380 |
| 1/4 H | 0.043301 | 0.054127 | 0.064952 | 0.075777 | 0.086603 | 0.097428 | 0.108253 |
| 1/8 H | 0.021651 | 0.027063 | 0.032476 | 0.037889 | 0.043301 | 0.048714 | 0.054127 |
| Thread Pitch | 0.6 | 0.7 | 0.75 | 0.8 | 1 | 1.25 | 1.5 |
|---|---|---|---|---|---|---|---|
| H | 0.519615 | 0.606218 | 0.649519 | 0.692820 | 0.866025 | 1.082532 | 1.299038 |
| 5/8 H | 0.324759 | 0.378886 | 0.405949 | 0.433013 | 0.541266 | 0.676583 | 0.811899 |
| 3/8 H | 0.194856 | 0.227332 | 0.243570 | 0.259808 | 0.324759 | 0.405950 | 0.487139 |
| 1/4 H | 0.129904 | 0.151555 | 0.162380 | 0.173205 | 0.216506 | 0.270633 | 0.324760 |
| 1/8 H | 0.064952 | 0.075777 | 0.081190 | 0.086603 | 0.108253 | 0.135317 | 0.162380 |
| Thread Pitch | 1.75 | 2 | 2.5 | 3 | 3.5 | 4 | 4.5 |
|---|---|---|---|---|---|---|---|
| H | 1.515544 | 1.732051 | 2.165063 | 2.598076 | 3.031089 | 3.464102 | 3.897114 |
| 5/8 H | 0.947215 | 1.082532 | 1.353164 | 1.623798 | 1.894431 | 2.165064 | 2.435696 |
| 3/8 H | 0.568329 | 0.649519 | 0.811899 | 0.974279 | 1.136658 | 1.299038 | 1.461418 |
| 1/4 H | 0.378886 | 0.433013 | 0.541266 | 0.649519 | 0.757772 | 0.866026 | 0.974279 |
| 1/8 H | 0.189443 | 0.216506 | 0.270633 | 0.324760 | 0.378886 | 0.433013 | 0.487139 |
| Thread Pitch | 5 | 5.5 | 6 | 8 |
|---|---|---|---|---|
| H | 4.330127 | 4.763140 | 5.196152 | 6.928203 |
| 5/8 H | 2.706329 | 2.976963 | 3.247595 | 4.330127 |
| 3/8 H | 1.623798 | 1.786178 | 1.948557 | 2.598076 |
| 1/4 H | 1.082532 | 1.190785 | 1.299038 | 1.732051 |
| 1/8 H | 0.541266 | 0.595393 | 0.649519 | 0.866025 |
So how do we produce the corresponding products according to the specifications required by customers? The following are the most common and most commonly used methods of controlling threads.
1. Torque Control Method: The most common and frequently used method is the torque control method. By setting a target torque value, a torque wrench or automatic tightening tool is used to achieve the predetermined torque. This method is simple and easy to operate but has low accuracy and is easily affected by friction. It is mostly used for products without special requirements, ensuring quality while reducing production costs, thus providing customers with more satisfactory prices.
2. Torque-Angle Control Method: This method involves first tightening the bolt to an initial torque and then turning it by a specified angle. Only two parameters need to be set (initial torque and tightening angle), making the operation process relatively intuitive. This method is suitable for most fasteners, as it can improve tightening accuracy and reduce the impact of friction on the preload. For the production of fasteners used in high-precision applications, we often adopt the torque-angle control method to ensure higher assembly quality and reliability
3. Yield Point Control Method: This method involves tightening the bolt to the material’s yield point, determining the yield point by monitoring changes in torque and angle. Although this method offers high precision, it demands advanced equipment and skilled operation. Due to its higher cost, it is rarely used for thread control.
4. Slope Control Method: This method identifies the seating point and yield point of the bolt by monitoring changes in the torque slope. It maximizes the utilization of the bolt’s yield strength but requires high-precision monitoring equipment. Due to the need for high-quality equipment, skilled technicians, and monitoring devices, this method is rarely used in factory production.
In addition to the different methods, there are other factors that affect the thread:
1. Use the right material: Threads of different materials behave differently during processing and use. Choosing the right material can improve the durability and reliability of the thread.
2. Processing accuracy: The processing accuracy of the thread directly affects its matching quality and service life. High-precision processing equipment and technology can ensure that the size and shape of the thread meet the requirements.
3. Surface treatment: Surface treatment of threads (such as galvanizing, oxidation, etc.) can improve their corrosion resistance and wear resistance and extend their service life. Controlling the size of the threads before surface treatment is the fundamental guarantee for the qualified size after plating.
4. Lubrication: During assembly and use, proper lubrication can reduce friction, prevent thread seizure and improve assembly quality.
5. Inspection and testing: Use special thread gauges and testing equipment to regularly inspect and test the threads to ensure that they meet standard requirements.
6. Assembly process: Correct assembly process and operation method can avoid thread damage and ensure assembly quality. For example, use a torque wrench to control the tightening torque to avoid over-tightening or under-tightening.
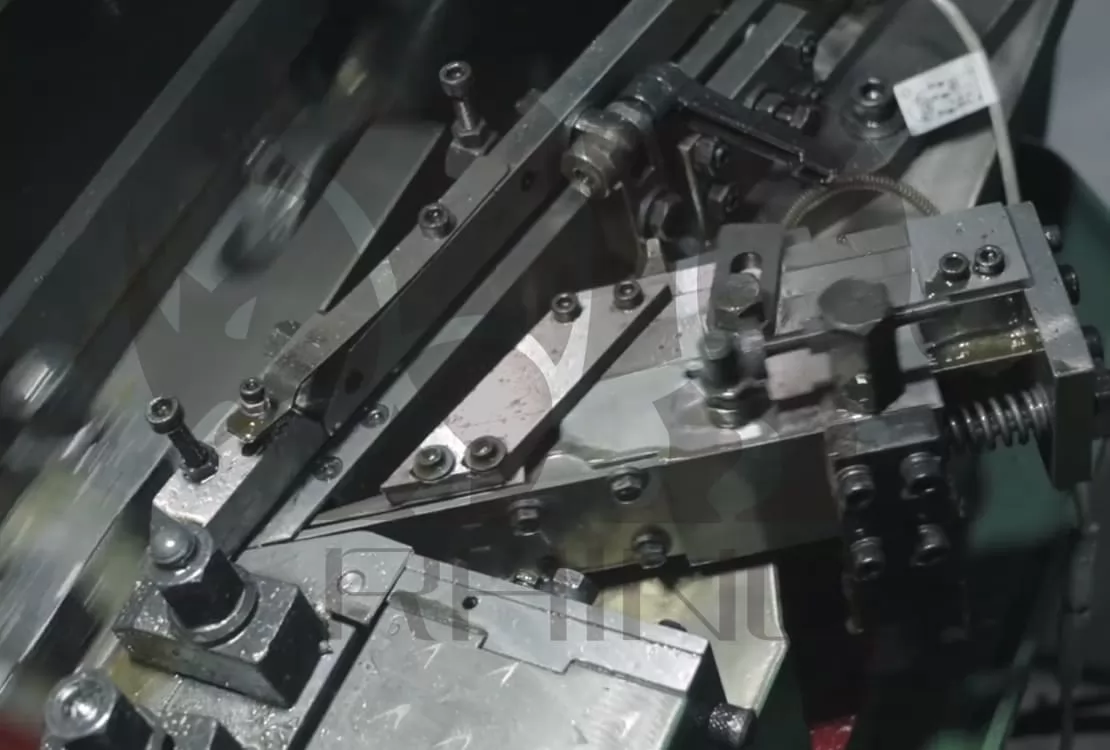
After understanding the factors that affect threads, let's finally introduce the steps of thread processing. Thread processing can be roughly divided into four types: turning threads, milling threads, tapping and threading, and rolling threads. In actual factory production, tapping and threading are mostly used.

|
ISO Shank and Shoulder Dimensions for Tapping Tools |
||||||
|
Shank
Diameter |
WSC,mm |
ISO 529 |
ISO 529 |
ISO2283 |
ISO2284 G |
ISO2284 Rc |
|
2.50 |
2.00 |
M1 |
|
|
|
|
|
2.80 |
2.24 |
M2.2 |
NO.2 |
|
|
|
|
3.15 |
2.50 |
M3 |
NO.4 |
M3 |
|
|
|
3.55 |
2.80 |
M3.5 |
NO.6 |
M3.5 |
|
|
|
4.00 |
3.15 |
M4 |
|
M5 |
|
|
|
4.50 |
3.55 |
M4.5 |
NO.8 |
M6 |
|
|
|
5.00 |
4.00 |
M5 |
NO.10 3/16 |
|
|
|
|
5.60 |
4.50 |
M5.5 |
NO.12 7/32 |
M7 |
|
|
|
6.30 |
5.0 |
M6 |
1/4 |
M8 |
|
|
|
7.10 |
5.60 |
M7 |
9/32 |
|
|
|
|
8.00 |
6.30 |
M8 |
5/16 |
M10 |
G1/8 |
Rc 1/8 |
|
9.00 |
7.10 |
M9 |
|
M12 |
|
|
|
10.00 |
8.00 |
M10 |
3/8 |
|
G1/4 |
Rc1/4 |
|
8.00 |
6.30 |
M11 |
7/16 |
|
|
|
|
9.00 |
7.10 |
M12 |
1/2 |
|
|
|
|
11.20 |
9.00 |
M14 |
9/16 |
M14 |
|
|
|
12.50 |
10.00 |
M16 |
5/8 |
M16 |
G3/8 |
Rc3/8 |
|
14.00 |
11.20 |
M18 |
11/16 |
M18 |
|
|
|
16.00 |
12.50 |
M22 |
7/8 |
M22 |
|
|
|
18.00 |
14.00 |
M24 |
1” |
M24 |
G5/8 |
Rc5/8 |
|
20.00 |
16.00 |
M27 |
1 1/8 |
M27 |
G3/4 |
Rc3/4 |
|
22.40 |
18.00 |
M33 |
1 1/4 |
|
G7/8 |
Rc7/8 |
|
25.00 |
20.00 |
M36 |
1 3/8 |
|
G1” |
Rc1” |
|
28.00 |
22.40 |
M39 |
1 1/2 |
|
|
|

|
DIN Shank and Shoulder Dimensions for Tapping Tools |
||||||||
|
Shank
Diameter |
WSC, mm |
DIN 352 |
DIN 371 |
DIN 376 |
DIN 374 |
DIN 2182 |
DIN 2183 |
DIN 353 |
|
2.5 |
2.1 |
M1 |
M1 |
|
|
|
|
|
|
2.8 |
2.1 |
M2 |
M2 |
|
|
|
|
|
|
3.20 |
2.4 |
|
|
|
|
|
3/16 |
|
|
3.50 |
2.70 |
M3 |
M3 |
M5 |
M5 |
|
|
|
|
4.00 |
3.00 |
M3.5 |
M3.5 |
|
|
1/8 |
|
|
|
4.50 |
3.40 |
M4 |
M4 |
M6 |
M5.5 |
5/32 |
1/4 |
|
|
6.00 |
4.90 |
M5 M6 |
M5 M6 |
M8 |
M8 |
3/16 |
5/16 |
|
|
7.00 |
5.50 |
M10 |
|
M10 |
M9 |
1/4 |
3/8 |
|
|
8.00 |
6.20 |
|
M8 |
|
|
5/16 |
7/16 |
|
|
9.00 |
7.00 |
M12 |
|
M12 |
M12 |
3/8 |
1/2 |
|
|
10.00 |
8.00 |
|
M10 |
|
|
|
|
|
|
11.00 |
9.00 |
M14 |
|
M14 |
M14 |
|
9/16 |
|
|
12.00 |
9.00 |
M16 |
|
M16 |
M16 |
|
5/8 |
|
|
14.00 |
11.00 |
M18 |
|
M18 |
M18 |
|
3/4 |
|
|
16.00 |
12.00 |
M20 |
|
M20 |
M20 |
|
|
|
|
18.00 |
14.50 |
M22 M24 |
|
M22 M24 |
M22 M24 |
|
7/8 |
|
|
20.00 |
16.00 |
M27 |
|
M27 |
M27 |
|
1” |
|
|
22.00 |
18.00 |
M30 |
|
M30 |
M30 |
|
1 1/8 |
|
|
25.00 |
20.00 |
M33 |
|
M33 |
M33 |
|
1 1/4 |
|
|
28.00 |
22.00 |
M36 |
|
M36 |
M36 |
|
1 3/8 |
|
|
32.00 |
24.00 |
M39 |
|
M39 |
M39 M42 |
|
1 1/2 |
|
|
36.00 |
29.00 |
M45 |
|
M45 |
M45 M48 |
|
1 3/4 |
|
|
40.00 |
32.00 |
M52 |
|
M52 |
|
|
2 |
G 1 3/4 |
|
45.00 |
35.00 |
|
|
|
|
|
|
G 2” |
|
50.00 |
39.00 |
|
|
|
|
|
|
G 2 1/4 |
In actual production, we should flexibly consider the above factors and make small changes to the original mature production system to produce fasteners of various specifications and sizes.

